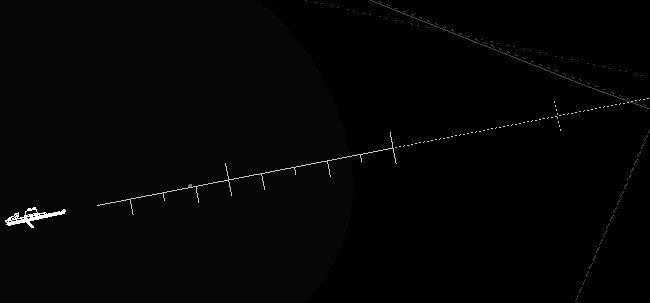
radial element
This is an extremely handy drawing element which you can use to draw complicated ILS extended centerlines.
| Root Element | map | |
|---|---|---|
| Element | radial | |
| Attribute | Format | Remarks |
| trk | float | inbound track value (0-360) |
| rad | float | outbound radial value (0-360) |
| mag | boolean | “True” or “False” to indicate whether the trk/rad values above are magnetic. Default is “False” if not supplied. IVAC2 will apply magnetic variation adjustment to bearings unless mag=“True”. |
| len | float | length of radial to draw (in nautical miles) |
| offset | float | offset distance in nm - start radial line from point this point |
| stroke_pattern | double array | line pattern described in an array of doubles |
| stroke_width | float | line width |
| stroke_color | string | color id name |
The <radial> element can contain one or more <marker> sub elements:
| Root Element | radial | |
|---|---|---|
| Element | marker | |
| Attribute | Format | Remarks |
| int | float | interval value at which to draw this marker |
| offset_cw | float | length in nautical miles of the marker to draw on the clock wise side |
| offset_ccw | float | length in nautical miles of the marker to draw on the counter clock wise side |
| skip | integer | skip x markers before starting to draw first marker |
| number | integer | draw only x number of markers |
| stroke_pattern | double array | line pattern described in an array of doubles |
| stroke_width | float | line width |
| stroke_color | string | color id name |
Each radial requires 1 <point> element which corresponds to the start of the radial. The <marker> elements are optional.
You should generally use TRUE bearings - magnetic variation is calculated by IVAC2. If you need to specify a magnetic bearing then ensure you set mag="true".
example
  <!-- ILS EBOS RWY 26 -->
  <radial trk="259" len="20" stroke_color="ILS">
      <point lat="N0511147872" lon="E0025109331"/>
      <marker int="1"  offset_cw="0.5" offset_ccw="0.5"/>
      <marker int="5"  offset_cw="1.0" offset_ccw="1.0"/>
      <marker int="10" offset_cw="1.0" offset_ccw="1.0"/>
  </radial>
  <!-- ILS EBOS RWY 08 -->
  <radial trk="079" len="10" stroke_color="ILS">
      <point lat="N0511211970" lon="E0025349610"/>
      <marker int="1" offset_cw="0.5" offset_ccw="0"/>
      <marker int="5" offset_cw="1.0" offset_ccw="0"/>
  </radial>
example using offset, skip and number attributes …
Smart usage of the <radial> element combined with several <marker> elements can result in complex radial drawings such as runway extension lines with different markers depending on the distance from the threshold:
  <!-- runway extension line, dashed, 25 NM long -->
  <radial rad="079" len="25" stroke_width="1" offset="10" pattern="2,2" stroke_color="ils">

      <!-- starting point -->
      <point lat="N0511211970" lon="E0025349610"/>

      <!-- draw 2 markers every 5 NM, skip first 3, counterclockwise 0.5 NM long, clockwise 0.5 NM long -->
      <marker int="5" offset_ccw="0.5" offset_cw="0.5" skip="3" number="2"/>

  </radial>
  <!-- rwy extension line, 10 NM long, drawn on top of the first 10 NM of the previous dashed line -->
  <radial rad="079" len="10" stroke_width="1" offset="1" stroke_color="ils">

      <!-- starting point = equal to the starting point of the previous dashed line -->
      <point lat="N0511211970" lon="E0025349610"/>

      <!-- draw a marker every NM but skip first 2, only clockwise 0.25 NM long -->
      <marker int="1" offset_ccw="0" offset_cw="0.25" skip="2"/>

      <!--  draw a marker every 2 NM but skip the first one, clockwise 0.5 NM long -->
      <marker int="2" offset_ccw="0" offset_cw="0.5" skip="1"/>

      <!-- draw a marker every 5 NM but skip the first one, clockwise and counterclockwise 0.5 NM long -->
      <marker int="5" offset_ccw="0.5" offset_cw="0.5" skip="1"/>

  </radial>
The radial line starts with an offset of 1nm from the runway threshold, the first two 1nm markers are skipped, and the first 2nm and 5nm markers are also skipped.
